Aperture, shutter speed, ISO in simple terms. Why change shutter speed, aperture and ISO: in simple words What is iso aperture
The exposure settings of the photo determine how dark or light the image captured by your camera appears. Believe it or not, there are only three settings options: aperture, shutter speed and ISO sensitivity ("exposure triangle"). Skillful use of them is an essential part of developing a photographer's intuition.
What is exposure
Getting the right exposure is more like trying to collect rainwater in a bucket. Although the rainfall is out of your control, you still have three factors: the diameter of the bucket, the time the bucket is exposed to rain, and the amount of water you want. All you have to do is gain not too little (“under-exposure”) and not too much (“over-exposure”). The key point is that there are many different combinations of bucket size, time and amount of water possible. For example, the same amount of water can be obtained in less time if you take a wider bucket, and vice versa, a narrow bucket will need to be kept out of the rain much longer.
In photography, exposure parameters are aperture, shutter speed and ISO sensitivity, which are similar to the bucket diameter, time, and amount of water described above. Further, both rain and natural light are out of the photographer's control.
Exposure triangle: aperture, shutter speed and ISO sensitivity

Each of the parameters affects exposure differently:
Diaphragm: controls the area through which light enters the camera
Excerpt: controls exposure duration
ISO number: controls the sensitivity of your camera's sensor to the amount of light
As a consequence, any combination of these three parameters can be used to achieve the same exposure. It is important, however, to know what you can sacrifice, since each parameter also affects other properties of the image. For example, aperture affects depth of field, shutter speed affects motion blur, and ISO determines the amount of visual noise.
Excerpt
The camera shutter detects when the camera sensor is open or closed for light entering through the lens. The exposure time determines how long the sensor will be open. “Shutter speed” and “shutter speed” mean the same thing, and shorter shutter speed means shorter shutter speed.
In numbers... The effect of shutter speed on exposure is probably the easiest to assess: it is related to the amount of light entering the camera as 1: 1. If the exposure time is doubled, the amount of light entering the camera also doubles. In addition, the widest range of values \u200b\u200bis possible for this parameter:
| Excerpt | Using |
|---|---|
| from 1 to 30 seconds or more | Shooting at night and in low light with a tripod |
| 2 to 1/2 seconds | Smoothing flowing water Tripod landscape photography with a great depth of field |
| 1/2 to 1/30 second | Getting motion blur for the background of a moving object Accurate handheld shooting with stabilization |
| 1/50 to 1/100 second | Typical handheld shooting without significant magnification (zoom) |
| 1/250 to 1/500 second | Freezing an object in motion Handheld shooting with significant magnification (telephoto lenses) |
| 1/1000 to 1/4000 second | Freezing very fast and very close movement |
How it looks... Shutter speed is a powerful tool for freezing or accentuating movement:
In creative photography or for waterfalls, for example, motion blur is sometimes desirable, while in most other cases it should be eliminated. As a consequence, the shutter speed is usually chosen based on the value that can provide a sharp picture - either to freeze motion or to avoid camera shake when shooting handheld.
How do you know which shutter speed will provide a sharp handheld shot? With digital cameras, it is easiest to experiment and evaluate the results on the camera screen (at full magnification). If the photo is blurry with the right focus, you will most likely need to shorten the shutter speed, keep your hands more stable, or use a tripod.
Diaphragm
The aperture number of a camera controls the area through which light can pass through the lens. The aperture value is referred to in terms of f-stops, which at first glance is not intuitive, since as the f-stop is growing, light transmission area decreases... In photographer jargon, if someone says “close” or “open” the aperture, they usually mean increasing or decreasing the f-stop, respectively.
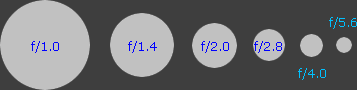
In numbers... Whenever the f-stop is halved, the light transmission area quadruples. This directly follows from the fact that the area of \u200b\u200ba circle is proportional to the square of its radius, but most photographers simply remember the f-stops that correspond to each increase or decrease in the amount of light by half:
| Diaphragm | Light transmission | Excerpt example |
|---|---|---|
| f / 22 | 1X | 16 seconds |
| f / 16 | 2X | 8 seconds |
| f / 11 | 4X | 4 seconds |
| f / 8.0 | 8X | 2 seconds |
| f / 5.6 | 16X | 1 second |
| f / 4.0 | 32X | 1/2 second |
| f / 2.8 | 64X | 1/4 second |
| f / 2.0 | 128X | 1/8 second |
| f / 1.4 | 256X | 1/15 second |
The above combinations of shutter speed and aperture will produce the same exposure.
Notes: Available shutter speed options do not always allow for faster or faster shutter speeds
exactly twice, but the approximations are always so close that the difference will be negligible.
The above f-stops are standard on almost any camera, although most cameras also allow more flexible settings such as f / 3.2 and f / 6.3. The range of values \u200b\u200bmay vary depending on the camera and lens. For example, a compact camera can have a range of f / 2.8 to f / 8.0, while a DSLR with a portrait lens can range from f / 1.4 to f / 32. A narrow aperture range is usually not a big problem, but a wider range provides more creative flexibility.
Technical Note: For many lenses, light transmission is also affected by transfer efficiency, although this is almost always a much smaller factor than aperture. Moreover, it is outside the photographer's control. The difference in transfer efficiency is usually more noticeable when using a high magnification (zoom). For example, a Canon 24-105mm f / 4L IS lens transmits approximately 10-40% less light at f / 4 than a comparable Canon 24-70mm f / 2.8L lens at f / 4 (depending on focal length ).
How it looks... The aperture value of the camera determines the depth of field (the range of distances within which objects appear sharp). Lower f-stop means less depth of field:
ISO sensitivity
The ISO speed determines how sensitive the camera is to light. Similar to shutter speed, ISO speed is related to exposure change as 1: 1. However, unlike aperture and shutter speed, a minimum ISO speed is almost always desirable because raising the ISO speed will significantly increase visual noise. As a consequence, the ISO speed is only raised when the required aperture and shutter speed are otherwise unattainable.
note: in traditional photography, visual noise was determined by "film grain"
ISO speeds such as 100, 200, 400, and 800 are generally available, although many cameras allow lower and higher values \u200b\u200bas well. ISO speeds in the 50-200 range usually provide acceptably low noise, while 50-800 (or more) is often acceptable with DSLRs.
Camera shooting modes

Most digital cameras have standard shooting modes: auto (), program (P), aperture priority (Av), shutter priority (Tv), manual (M), and shutter release (B) modes. Av, Tv, and M modes are often referred to as "creative zone" or "auto exposure (AE) modes".
Each of these modes affects how aperture, shutter speed, and ISO speed are selected for a given exposure. Some modes try to match all three values \u200b\u200bfor you, others allow you to select one parameter and let the camera pick up the other two (if possible). The following table describes the effect of each of the shooting modes on exposure parameters:
| Shooting mode | Principle of operation |
|---|---|
| Auto () |
The camera automatically selects all shooting parameters. |
| Program (P) | The camera automatically adjusts the aperture and shutter speed; you can choose ISO speed and exposure compensation. |
| Aperture priority (Av or A) |
You choose the aperture and ISO speed, and the camera automatically selects the appropriate shutter speed. |
| Shutter Priority (Tv or S) |
You choose the shutter speed and ISO speed, and the camera automatically selects the appropriate aperture. |
| Manual (M) | You choose aperture, shutter speed and ISO speed, regardless of whether the selected values \u200b\u200bwill give the correct exposure. |
| Launch (B) | Useful for exposures longer than 30 seconds. You choose the aperture and ISO speed, and the shutter speed is determined by either the remote switch or the second you press the shutter button. |
In addition, the camera can have several preset shooting modes; the most common are landscape, portrait, sports and night modes. The symbols used for each mode vary slightly depending on the camera model, but will likely look similar to the following:
| Shooting mode | Principle of operation |
|---|---|
| Portrait |
The camera is trying to find the lowest f-stop possible for the given exposure. This ensures the smallest possible depth of field. |
| Landscape |
The camera tries to adjust the f-stop as high as possible to provide more depth of field. Compact cameras often set the focusing distance to infinity in addition. |
| Sports |
The camera tries to achieve the fastest shutter speed for the selected exposure - ideally 1/250 second or less. In addition to using a low f-stop, shutter speed is usually achieved by raising the ISO speed more than would be acceptable in portrait mode. |
| Night |
The camera permits slower shutter speeds than is usually allowed for handheld photography and raises the ISO to near the maximum possible. However, in some cameras, this mode means that flash is used to illuminate the foreground, while slow shutter speeds and high ISOs are used for the background. Check your camera manual for its unique characteristics. |
Keep in mind, however, that for the most part, the above settings depend on the camera's metering system, which determines the correct exposure. When shooting complex subjects, the metering system can often be fooled, so it is useful to understand under what conditions it can go wrong and what can be done to compensate for exposure errors (see the chapter on camera metering).
Finally, some of the above modes can also control camera settings that are not related to exposure, but this depends on the camera model. These advanced options may include, but are not limited to, focus points, metering and autofocus modes.
If you bought your first DSLR, mirrorless or any other camera that supports the so-called manual settings, then, definitely, our today's article will be useful to you. So, today we'll talk about the three main parameters of shooting - shutter speed, aperture and ISO.
What is a camera aperture?
Photography is light painting. Therefore, both aperture and shutter speed affect the amount of light that enters the sensor after pressing the shutter button.
Aperture is one of the main parameters of shooting. Strictly speaking, aperture is a parameter that refers not to the camera itself (carcass), but to the lens. Therefore, it would be more accurate to ask what is the lens aperture?
So, lens aperture Is a mechanical setting that allows you to adjust the amount of light passing through the lens. Roughly speaking, a diaphragm is a hole through which light passes. If you dig deeper, you can find out that the lens diaphragm is a few blades that change their position, thereby reducing or enlarging the hole through which light passes. 
What do you need to learn from this first? First, the larger the aperture, the more light passes through the lens. Second, you also need to know WHAT IS LESS f-number, the wider the "hole" is, which means the LARGE is the diaphragm. Thus, with modern lenses, the maximum aperture is reached at f / 1.2 and f / 1.4. Even faster apertures like f / 1.0 and f / 0.95 are available on expensive, exclusive lenses that are usually not used even by professionals.
So let's take a couple of specific lenses as an example. Let's say Nikon 18-105mm f / 3.5-5.6G and Nikon 50mm f / 1.4D. Their maximum aperture is indicated in the name. For the first lens it is f / 3.5 at 18mm and f / 5.6 at 105mm, for the second it is f / 1.4. This parameter is also called luminous efficiency... Moreover, note that only the maximum aperture is indicated. Close the diaphragm up to values \u200b\u200blike f / 7.1, f / 11 can be done with any lens. The extreme value is usually f / 22 for zoom (18-105mm) and f / 16 for prime (50mm). We talked about zooms and fixes in a separate article.
What is a shutter speed in a camera?
Just like aperture, shutter speed affects the amount of light that eventually hits the camera's sensor (or film). If the aperture controls the amount of light using the diameter of the hole in the lens, then the shutter speed is a parameter of the carcass itself.
Excerpt - this is the time during which the light exposes the light-sensitive element, which is the matrix of the camera today. Shutter speed is measured in fractions of a second. For example, 1/60, 1/800. The shutter speed can be longer than a second, usually it is denoted 1 '' (1 second), 10 '' (10 seconds), etc. For shutter speeds less than a second, the unit can be omitted for convenience, and thus the shutter speed can be designated as 60, 800, etc.
What is ISO in a camera?
Currently ISO Is the photosensitivity of the camera matrix. This is the third parameter that can affect the exposure of the photo. The base ISO on modern cameras is 100-200 units. The maximum can be ISO 6400, 12800 and more. The physically larger and better quality the matrix of the camera, the greater the ISO capabilities.
In general, roughly speaking, ISO is the parameter that affects noise snapshot. The higher the ISO, the more so-called noise in the photo. Accordingly, low-noise sensors are very much appreciated today, because they allow you to shoot handheld in poor lighting conditions and get good pictures. Here are the cameras that are currently leading in terms of ISO: Sony A7s, Nikon D800e, Nikon D800, Nikon Df, Nikon D4s, Nikon D4, Nikon D600, Nikon D610. As you can see, Nikon cameras, which are mainly based on Sony sensors, are the best at coping with noise so far. Here is such a paradox. However, the leader is still the Sony A7s, which at the time of this writing has just appeared. 
This picture was taken at ISO 900. Below are the enlarged fragments (cropped) of this frame at different ISOs. Enlarged the upper right part of the candlestick

How to work with shutter speed, aperture and ISO
We've looked at three parameters that affect the exposure of a photo. Now let's see how these parameters interact with each other and what each of them affects.
So, let's assume that we are in conditions where ISO 400, aperture f / 4 and shutter speed 1/400 give us an ideal exposure, which we will designate as 0. But then a source of additional light appeared (the sun came out, put an additional illuminator, etc. .). The exposure shifts from 0 to the + side, suppose by 1 stop (the frame becomes brighter, "Overexposures"). What is one stop and how can we make the frame a little darker so that there is no overexposure? Roughly speaking for ISO and shutter speed 1 stop Is an increase or decrease in the value by 2 times. For aperture 1.4 times. Thus, to darken the frame, we have the following options:
- Reduce ISO from 400 to 200.
- Reduce shutter speed from 1/400 to 1/800.
- Close aperture from f / 4 to f / 5.6
Now let's see what this will ultimately affect:
- The amount of noise in the frame will decrease.
- There will be practically no changes.
- The area of \u200b\u200bfocus will increase, blurring (bokeh) will decrease.
Thus, if we are shooting a portrait, then the first option is best for us, because there will be less noise. If we shoot a landscape, then again, a good decision would be to choose the first option, but the third option, under certain conditions, can improve the picture (it will become sharper). If we are shooting sports, then the second option will be preferable, since the shorter the shutter speed, the easier it is to catch movement.
How to work with basic shooting parameters in real life
What we described above can be used when photographing, working with all the parameters manually. That is, set the manual mode (M) on the camera and monitor each parameter. Now I'll tell you a secret. Most even professional photographers do not shoot in manual mode.
Every camera that supports manual settings has shutter priority and aperture priority modes. We talked about this in the article "How to take pictures with a DSLR".
Aperture Priority Mode allows you to control only the aperture, and leave the shutter speed at the mercy of the camera's automation. Shutter priority mode works in a similar way, only in it you are responsible for exposure.
Add to this the excellent Auto ISO system in modern cameras, which selects sensitivity based on a specific situation, and it turns out that you control only 1 selected parameter. 
Nikon mode dial: M - manual, A - aperture priority, S - shutter priority
For example, let's say you choose aperture priority for a portrait photo on a sunny day. Set your aperture to 2.8. Automation selects the required shutter speed, and ISO in such conditions is set to 100 units (that is, to the minimum value). In general, the camera always tries to set the lowest possible sensitivity value. Thus, you get, for example, an aperture of f / 2.8 (which you set), a shutter speed of 1/1600 and ISO 100 (these two values \u200b\u200bwere chosen by the automatic). If the resulting frame is too light or, on the contrary, too dark, you can directly influence the exposure by increasing or decreasing its value. How one level of exposure affects the change in parameters is described above. In case aperture priority mode is selected, changing the exposure by 1 stop plus will force the automatic to reduce the shutter speed to 1/800 to make the frame brighter. In this case, the aperture value is a constant for us, and the change in exposure occurs only due to two parameters, ISO and shutter speed. By the way, pay attention to the fact that the exposure step in modern cameras is usually set to 1/3 stop. That is, it usually looks like this: 0, +1/3, +2/3, +1, etc. A 1/3 change will reduce the shutter speed not to 1/800, but to 1/1250.
Thus, the aperture priority mode allows you to concentrate on only one parameter and not be distracted by others. In this case, the photographer controls exactly the parameter that interests him. With the shutter priority mode, everything is about the same, however, based on personal experience, I can say that it is usually less in demand.
conclusions
As you already understood, dealing with all these settings is not so difficult. Within the framework of one article, I, in general, tried to explain on my fingers what parameters and what influence. You just need to read about it once, and then play a little with the settings of your camera and see what happens when you change this or that parameter. I hope this article helped you understand a little better how your camera works. See you soon and good shots!
I finally realized that why you need a shutter speed, aperture and ISO should be written as clearly as possible, in simple words. There are too many questions from students and readers, it is easier to give a link.
Excerpt
So, excerpt. This is the time it takes for the light to hit the matrix. Measured in seconds and fractions of a second. Usually, the camera can set the shutter speed from 30 seconds to 1/4000 of a second, for older models up to 1/8000.
"One 8000th of a second" is very little, the so-called "very short shutter speed" - you can freeze the wings of a hummingbird in the picture or catch a shell almost frozen in the air flying out of the muzzle of a tank (if the reaction is enough to pull the trigger on time). The shorter this time, the shorter the shutter speed, the less light will pass into the camera, onto the matrix.
“Thirty seconds” is a lot, that is, “very long exposure” - when there are no cars on the night street, but only traces of their headlights, this is just a few seconds of exposure.
Using the Bulb mode or a remote control cable, you can give a shutter speed of tens of minutes. For example, to take a photo of the sky with stars smeared in lines.

People who are standing and posing for you can be filmed for 1/30 of a second, if they are not frozen but still behave calmly, it is better to shoot at 1/100 of a second. Children who run actively by 1/300 of a second. I would shoot a hockey player at a match or a basketball player for 1 / 250-1 / 800 seconds to freeze. A cyclist in flight over a track, a snowboarder in a jump, or a rally car flying over a hillock, 1/1000 of a second or less. And here is a frame taken in the subway with a shutter speed of 1/5 second - you can see that motionless people are sharp, and moving people are blurred.
At the same time, if I want to shoot a clear car, so that it has smeared rotating discs and a background smeared from movement in the back, I will set the shutter speed of the order of 1/40 - 1/60 and drive the car "in the sight" of the camera, and in the right moment I will smoothly press the trigger without stopping the movement. This is called a guided survey. So you can, but what does not move itself move and also shoot. Here's an example shot recently taken with a Sony A7 at 1/60 second exposure on the Garden Ring:
On a lens with a focal length of 50 millimeters, it is better to shoot at a shutter speed of 1/50 and shorter (1 / 100-\u003e 1/1000 ....), and if there are more millimeters, then reduce the shutter speed accordingly. For example, at 100-400mm it is worth photographing from 1/100 to 1/400, depending on the focal length (general formula 1 / F where F \u003d the focal length of the lens). This is the case. The reason is simple - the lens is shaking in your hands, and if you choose too slow shutter speed, you blur the picture. It becomes blurry not because the lens is bad, but because you are shooting wrong.
Diaphragm
Have you seen how a person's pupils narrow in the sun, but dilate in the dark? Essentially, it is the diaphragm in the eye that works.
Adjusts the amount of light that enters the camera through the lens onto the sensor. The more it is folded (closed), the less light penetrates. The diaphragm should be closed if there is more light than you need. But this is only half the battle.
At the same time, the aperture adjusts the depth of field. "Depth of field" is not the same as sharpness, that is, I'm not talking about the clarity of the picture, and not about whether the hair and fabric in a photograph of a person is sharp, whether every lint is visible. It's about whether the background is smeared behind it or not. The wider the aperture is, the shallower the depth of field. On lenses like f / 1.4 or f / 1.2, it can be sooo small - literally millimeters. That is, in the portrait, the eyes will still be sharp, and the ears and the tip of the nose will already be blurred.
Yes, and the depth of field is not only about the background - everything outside of it is blurred, both in front and behind.
The closest analogy from life is how a person squints. When the eyelids are strongly compressed, the same depth of field increases, and what a person saw before that was blurred, due to some peculiarities of aiming the eye at a distance, or optical defects of the eye itself, it becomes clear.
Depth of field is measured in meters (centimeters and millimeters) - the more the aperture is closed, the further away from you the blur will begin.
If you close the aperture too far (up to f / 22, for example) together with the increased depth of field, the picture will begin to lose clarity. You will get the depth of sharp space "from me to the horizon", but you will no longer be able to make out even on clear objects small details - capillaries on leaves, antennae near a flower and an inscription in small print on a fence, because it is difficult for light to penetrate through a very closed opening in the lens , it starts to mix.
ISO
Sensitivity of the sensor to light. The higher the value, the better the sensor sees in the dark, the less light it needs to get a similar picture.
If we take analogies from anatomy, then this is like the sensitivity of the eye: there are those who see in the dark better than others, and if they were robots, one could say about them, they have "higher ISO".
The higher the sensitivity, the more grain and noise in the photo, the more sharpness (not depth of field!) And detail drops. If at ISO 100 every hair is visible on a portrait of a person, then at ISO 25600 they will all be smeared into mush, the photo will be something like a picture where hair was painted with brush strokes [and sprinkled with sand].
The main thing here is ... not to be afraid! The value of the shot is not in the sharpness of the hair. As practice has shown, if you take photos from any more or less modern camera, be it Canon 550D or Nikon D3100, not to mention more modern and older models, taken at ISO 6400 and printed on A4 format, it will be clear that the picture is still very much nothing... All this noise, which is very clearly visible at high zoom, is completely lost when printing or reducing the size of the photo.
Here's what the test image looks like, unprocessed, taken at ISO 12800 on a Canon 1D X:
More examples can be found in the post "
The article is a retelling of the explanations Sergei Chigarevon the forum club.foto.ru
The original text of the post is located at http://club.foto.ru/forum/view_topic.php?t...age\u003d1#listStart
Wide aperture (large hole) - e.g. 2.8 - small DOF
Narrow aperture (small hole) - e.g. 16.0 - large DOF
Medium aperture - e.g. 5.0 - medium depth of field
If you want to sharpen the object, and make everything else unsharp, you need to reduce the DOF (i.e. decrease the aperture).
Excerpt. With the theory, I think everything is clear here too. The shorter - the shorter the moment of life will be able to capture.
Exposure longer than 1 / f threatens shake (this is when the movement of the camera blurs the image in the picture).
Sensitivity (ISO).Everything is simple here, because nowadays it is just a semi-mythical parameter in a digital camera.
Rule - the lower the ISO, the better... At higher ISOs, there is more digital noise in the photo. You need to set the value as low as possible, for example 100. We increase it only as necessary in conditions of lack of light.
Now about juggling with all three parameters.
Consider shooting outdoors. So far we are not talking about flash and indoor shooting, we just shoot with a camera on the street.
Let's start with ISO. We put the lowest value, because there is usually enough light outside.
Here is a rule that needs to be added to the brain firmware and programmed as quickly as possible. The rule, oddly enough, is simple. Namely - when shooting in open areas in sunny weather, set the shutter speed equal to ISO(or film sensitivity if you have a film camera).
Just an example. It costs ISO 100 - which means we set the shutter speed on the camera to 1/100 sec. The diaphragm is 16. THIS must be remembered! Just remember, saying to yourself: "In the sun one hundred by sixteen".
"Well, nifiga myself, I myself said that it is useless to put such a diaphragm on a digital, but here on you!" - you will say and you will be right. Because the next step will be the creative definition of the aperture for a particular shot.
Example. This is a landscape .. sharpness should be in the foreground bushes and on the horizon. This means aperture 8 is needed (a rather narrow aperture is quite large). Our goal now is to find a shutter speed that matches aperture 8. It's simple. We start to sort out " expo-pairs»:
1/100 - aperture 16
1/200 - aperture 11
1/400 - aperture 8
. . . . . . . .
Don't be fooled that the camera doesn't have a shutter speed of 1/400 sec. Surely there is 1/320, so put it on, and then you will understand. (Those who are now shouting about the usual gradation of shutter speeds like 125, 250, 500, let them shout and set 1/500, but we initially have a digital camera, and we comprehend theoretical truths).
Do not forget that we are talking about sunny weather and open areas. I think at this stage it is useful to once again play with the camera in aperture priority or shutter priority mode and understand again what is expopara... Got it? Now imagine that you are shooting a portrait in sunlight and you decide that you need aperture of 4 to select only the person's face. What will be the exposure?
(Answer. Continuing a series of expo pairs:
1/400 - aperture 8
1/800 - aperture 5.6
1/1600 - aperture 4 - here she is!)
The analyzed situation is one-sided, because you shoot not only in sunny weather. Therefore, we will make corrections for other weather conditions. At one time, it was famously done at the Smena f / a, there were drawn symbols of the weather. So the next step will be weather analysis.
So, once again the rule:
(X - set ISO on the camera or the sensitivity of the film)
shutter speed \u003d 1 / X
Choosing a diaphragm:
16 - sun
11 - in the shade of the sun
8 - the sun was covered by a light cloud
5.6 - in the shade of the sun, which was covered by a light cloud
4 - cloudy
2.8 - cloudy
2 - full f ...
Summarize.
Actions when shooting outdoors.
Let's take an example.
The initial conditions are the sun behind a cloud, the scene requires a shallow depth of field, ISO 100.
Decision. Let's define the initial exposure couple - ISO 100, which means the shutter speed is 1/100. The lighting is the sun behind the cloud, which means the aperture is 8.
The 100/8 expo-pair is received. The plot requires a small depth of field, which means we strive for the widest possible aperture. We iterate over:
100 - 8
200 - 5.6
400 - 4
800 - 2.8
If the last pair suits you, then set the shutter speed to 1/1000 and the aperture 2.8
Homework.
When shooting outdoors in 1 / X shutter priority mode, note what the camera recommends. Memorize the state of nature in numbers. Over time, you will begin to fix the weather forecast for yourself in aperture values \u200b\u200band you will be able to tell us the weather in your city in one number.
Actually, the quick and easy way to master photography is just one click away.
Click! ![]()
The success of a shot can be judged by completely different criteria: a well-captured moment, an emotion accurately conveyed in a portrait, the atmosphere of an interior shot. The list can be continued for quite a long time.
One factor, like color accuracy, can be damn important in product photography, but not so important in street photography. What really matters at all times and is the basis of any photograph is the light. Rather, the amount of it that got into your cell. This is called exposure. The shot is too dark? This means that not enough light got into the camera, and it came out underexposed. Everything is white, although it shouldn't be? This is a clear sign of an overexposed frame: too much light has hit the camera matrix or film.
Exposure is controlled by changing three parameters: shutter speed, aperture and sensitivity (ISO). Let's take a look at each of them.
Diaphragm

The diaphragm is a hole with a variable diameter inside the lens, through which light enters directly onto the photosensitive sensor of the matrix or film. The principle of the diaphragm is similar to the principle of the human pupil: the wider it is open, the more light falls on the retina. The opposite is also true: to limit the amount of light, say, on a bright sunny day, the pupil is noticeably constricted.
Aperture settings are called stops. Here is a typical example of a lens aperture pitch.
f / 1.4 - f / 2 - f / 2.8 - f / 4 - f / 5.6 - f / 8 - f / 11 - f / 16 - f / 22
The smallest number corresponds to the widest aperture and the largest amount of transmitted light. With each next stop, the amount of transmitted light is exactly halved. Accordingly, the amount of light received by the camera sensor at f / 2.8 will be four times less than at f / 1.4. Thus, the exposure is controlled using the aperture.
Besides controlling incoming light, the aperture is responsible for another important thing in photography - depth of field.

Aperture f / 2.8. The background and foreground are noticeably blurred.

Aperture f / 8.0. The depth of field is much deeper than in the previous image.
Depth of field determines how much the foreground and background are blurred in relation to the subject you are focusing on. If you take a photo with the aperture open, you will get very strong blurring of objects out of focus. This is called shallow depth of field. If you shoot with the aperture closed, the depth of the sharply displayed space will increase significantly.
Controlling depth of field is important in different genres of photography. When shooting landscapes or interiors, most often you need to get the entire image in the focus area.

On the other hand, the easiest way to separate your subject from the background is to blur it. This technique is often used in portrait photography.

Excerpt
The shutter speed (or exposure time) determines how long the light will hit the camera's sensor or film.
The camera shutter opens only for the duration of the exposure of the photo, allowing the light to reach the matrix for a strictly defined time. Accordingly, the longer the exposure, the brighter the photo will be.
The shutter speed control works in a stop system similar to the aperture. Each subsequent value reduces the amount of light received by exactly half.
1/2 – 1/4 – 1/8 – 1/15 – 1/30 – 1/60 – 1/125 – 1/250
In 1/4 second, the camera sensor receives only half of the light that it would receive with an exposure of 1/2 second (with the same shutter speed and aperture settings).
A fast shutter speed allows us to "freeze" the frame, while a slow shutter speed allows us to blur moving objects.

This photo was taken at 1/1250 of a second. Such a short exposure time allows you to stop the rapid flow of water and see its individual splashes.

And this photo was taken at a shutter speed of a third of a second. The water looks completely different here.
If you want to get a clear photo of something very fast, then you need to take a picture at a fast shutter speed.
ISO

ISO determines how sensitive your camera is to light. The lower the ISO value, the less sensitive the sensor is, while the higher the ISO value allows you to shoot in very dark conditions. That is, unlike shutter speed and aperture, you do not control the amount of transmitted light, but change the sensitivity of the sensor itself.
At a time when photography was only analog and we could shoot exclusively on film, the sensitivity was chosen only once: at the moment of choosing this very film. Now we can change it at any time by simply changing the settings in the camera.
ISO stops: 100 - low sensitivity, 12800 - high. Each new value doubles the exposure of the frame.
100 – 200 – 400 – 800 – 1600 – 3200 – 6400 – 12800
When the sensitivity is increased, noise appears in the photo. Its amount is individual for different cameras. Some cameras produce decent quality images at ISO 6400, while others fail at these values. In any case, if you want the clearest possible image, try to shoot at low sensitivities. Another thing is that this is not always possible.

For example, this photo was taken in a theater with a lack of light at ISO 3200 and a shutter speed of 1 / 100th of a second. If I took a shot at a lower sensitivity, then I would either have to open the aperture more, risking a missed focus, or slow down the shutter speed and deprive myself of the opportunity to get a blurry image.
How it works with each other
How do sensitivity, aperture, and shutter speed work together? Just. Let's take an example.

Let's say you want to reduce the depth of field in this image and open the aperture to f / 2.8.

The result is an image with a blurred background, but now it is overexposed, because the open aperture allows more light to pass through. In this case, the difference of 2 stops can be compensated for either by shortening the shutter speed or by reducing the aperture. Nobody will forbid you to change two parameters at once instead of one. That is, you can either reduce the shutter speed or ISO by two stops, or each parameter by one.
